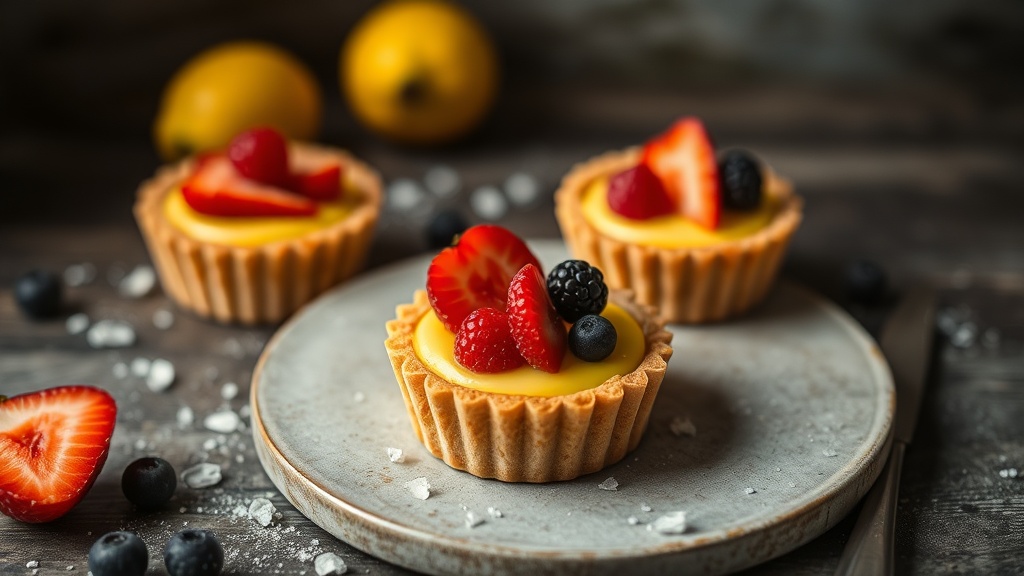
Summer's Sweet Secret: Achieving Crisp Crusts and Brilliant Fruit Custard Tarts

How Do You Prevent a Soggy Bottom in Fruit Tarts?
Despite the seemingly simple combination of fruit, custard, and pastry, the humble fruit tart consistently ranks among the most challenging bakes for home chefs, with many encountering issues like stubbornly soggy crusts or surprisingly bland fillings. It’s a disheartening outcome when you’ve poured your heart into creating something beautiful, only for the base to surrender its crispness. But what if I told you the secret to a perfectly firm, flaky foundation lies in a few deliberate steps, not just luck?
The primary culprit behind a soggy tart bottom is moisture — specifically, moisture from your custard filling migrating into the par-baked pastry during the final bake. To combat this, our strategy involves creating a robust barrier and ensuring the crust is sufficiently dried and set before the filling even enters the picture. Think of it as fortifying a castle against a gentle siege.
First, the art of blind baking cannot be overstated. It’s more than just baking an empty shell; it’s about establishing structure. After lining your tart pan with your chosen dough — a rich pâte sablée or a tender pâte sucrée works wonderfully here — thoroughly chill it. This firming-up prevents shrinkage and helps the butter maintain its structure. Once firm, prick the bottom with a fork, line it with parchment paper, and fill it with pie weights, dried beans, or rice. These weights provide crucial support, preventing the sides from collapsing and the bottom from puffing up. Bake until the edges are golden and the base feels dry and lightly colored. Removing the weights for the last 5-10 minutes allows the bottom to achieve a uniform, golden hue.
However, blind baking alone might not be enough for particularly wet fillings. This is where an additional sealing step comes into play. Once your crust is blind-baked and still warm, you can brush a very thin layer of egg wash (an egg yolk whisked with a teaspoon of water) or melted white chocolate onto the bottom and sides. The residual heat from the crust will quickly set the egg wash, creating a protein barrier, or firm up the chocolate, forming an impermeable shield against moisture migration. This microscopic layer acts as a sealant, ensuring your crust stays crisp and distinct from the creamy filling it holds. A few extra minutes of baking after applying the egg wash will ensure it's fully cooked and adhered.
Finally, consider the temperature of your filling. Introducing a hot filling to a warm crust creates steam, which is another enemy of crispness. Always allow your custard to cool significantly — ideally to room temperature or even slightly chilled — before pouring it into your prepared crust. This simple adjustment minimizes steam production and gives your crust the best fighting chance against sogginess. The patience here truly pays off, yielding a tart that holds its structural integrity, slice after glorious slice. You want to give the crust ample time to completely cool before adding the custard, allowing any trapped steam to dissipate, rather than creating a steamy environment that will soften your perfectly baked base.
What Makes a Fruit Custard Truly Shine?
A fruit tart is only as good as its custard, wouldn't you agree? That silky, luscious filling is the heart of the dessert, and achieving a truly brilliant custard — one that’s rich, flavorful, and perfectly set — is a blend of careful ingredient selection and precise technique. It’s about coaxing the best from each component, creating a symphony of textures and tastes.
The foundation of any exceptional custard begins with the quality of your dairy and eggs. For a truly indulgent experience, opt for full-fat dairy — whole milk, heavy cream, or a luxurious blend of both. The higher fat content contributes to a richer mouthfeel and a more stable emulsion. Fresh, high-quality eggs are equally vital; they provide both structure and emulsification, giving the custard its characteristic smoothness. Using farm-fresh, vibrant-yolked eggs can even enhance the visual appeal, lending a deeper, more inviting color to your finished product.
Tempering, a technique that sounds intimidating but is quite straightforward, is your best friend when combining hot liquids with delicate eggs. Pouring hot milk directly into cold eggs would scramble them instantly, creating an unappealing texture. Instead, slowly whisk a small amount of the hot dairy into your beaten eggs, raising their temperature gradually. Once the eggs are warm, you can then pour the warmed egg mixture back into the remaining hot dairy, whisking continuously. This gentle integration ensures a smooth, lump-free custard base, crucial for that velvety texture we crave. It’s a step that demands your full attention, but the reward is a custard free from unwanted scrambled bits.
Gentle cooking is the third pillar. Custards are notoriously fickle; too high a heat, and they’ll curdle; too low, and they won't set. The ideal method involves cooking over medium-low heat, stirring constantly with a spatula or wooden spoon, until the custard thickens to coat the back of the spoon. Alternatively, a bain-marie (water bath) offers an even gentler, more controlled heat, reducing the risk of scorching or scrambling, particularly for baked custards. The key is to watch for specific visual cues — a thickening consistency, steam rising, and perhaps a few gentle bubbles — rather than relying solely on a timer. For precise results, an instant-read thermometer is invaluable; most custards are perfectly set between 170°F (77°C) and 180°F (82°C). Overcooking leads to a rubbery texture, while undercooking leaves you with a loose, runny mess.
Finally, consider flavor infusions. While classic vanilla is always welcome, don't shy away from experimenting. Zest from lemons, oranges, or limes can brighten a custard beautifully. A cinnamon stick or a few cardamom pods steeped in the milk, then strained out, can add subtle warmth. Even a splash of a complementary liqueur — Grand Marnier with orange zest, or a good quality rum with tropical fruits — can add a layer of complexity that truly makes your custard sing. These small additions transform a good custard into an unforgettable one, making each bite an exploration of nuanced flavors.
How Can You Achieve Vibrant Fruit Presentation and Flavor?
A fruit custard tart is a feast for the eyes as much as it is for the palate. The arrangement and preparation of your fruit can transform a simple dessert into a stunning centerpiece. Achieving both visual vibrance and peak flavor requires thoughtful selection and clever techniques that enhance, rather than mask, the natural beauty of the produce.
Start with the best fruit you can find. Seasonal, ripe fruit will always offer the most intense flavor and appealing color. Local farmers’ markets are an incredible resource for this. Look for berries that are plump and firm, stone fruit that yields slightly to gentle pressure, and citrus with fragrant, unblemished skins. Washing and drying your fruit thoroughly is crucial — excess moisture can dilute flavors and contribute to a watery filling. For larger fruits like peaches or plums, precise, uniform slices not only look professional but also cook more evenly, ensuring each piece is tender and delicious. Small berries, on the other hand, often shine when left whole, their natural shapes adding textural interest.
Arrangement is your canvas. Whether you opt for a tightly packed, symmetrical spiral of kiwi and strawberries, a rustic scattering of mixed berries, or an artistic mosaic of thinly sliced plums, consider how the colors and shapes interact. Think about creating contrast and balance. A base layer of one fruit, topped with another, can add depth. Building height in the center can create a dramatic, enticing focal point. Don’t be afraid to experiment — sometimes the most striking presentations emerge from playful, intuitive placement. Remember, each piece of fruit is a brushstroke on your pastry canvas.
To protect the fruit's freshness and add an irresistible sheen, a simple glaze is indispensable. An apricot or red currant glaze, warmed and strained for smoothness, can be brushed over the fruit after the tart has cooled. This not only adds a beautiful, glossy finish that makes the colors pop but also acts as a protective layer, preventing the fruit from drying out and extending its visual appeal. A neutral glaze made with pectin or agar-agar can also serve this purpose, allowing the fruit's natural colors to be the star. The goal is a delicate shimmer, not a heavy, syrupy coat.
Finally, consider the crucial balance of sweetness and tartness. If your fruit is particularly tart, a light dusting of powdered sugar just before serving can soften its edge. Conversely, if your fruit is very sweet, a squeeze of lemon juice in your glaze or a whisper of citrus zest in the custard can provide a welcome counterpoint, preventing the tart from becoming cloyingly sweet. This thoughtful pairing elevates the overall flavor profile, ensuring each bite offers a dynamic and engaging taste experience. For more on creating delicious fruit combinations, resources like