Mastering the Art of Sourdough: A Beginner's Guide to Perfect Loaves

What Do You Need to Start Baking Sourdough at Home?
You don't need much. A kitchen scale (the OXO Good Grips 11-Pound Stainless Steel Scale works well), a large glass or plastic container for mixing, a bench scraper, and a Dutch oven—that's the foundation. Many bakers at Hof Kelsten in Montréal started with exactly this setup. A banneton (proofing basket) helps, though a kitchen towel-lined bowl does the job fine. Don't buy a lame (the razor tool for scoring) right away—use a sharp chef's knife or a single-edge razor blade.
The real equipment is patience. Sourdough doesn't follow your schedule. It follows fermentation. Some days, dough rises in four hours. Other days—especially in winter—it takes eight. That's the nature of working with wild yeast. (The temperature of your kitchen matters more than most beginners realize.)
How Long Does It Take to Create a Strong Sourdough Starter?
Seven to ten days minimum. Some bakers see activity sooner. Others wait two weeks. The timeline depends on your flour, your water, and the temperature of your kitchen.
Here's the thing—day three often tricks people. The mixture bubbles aggressively. It smells fruity, almost like yogurt. Then day four arrives, and everything looks dead. This isn't failure. It's the bacteria stabilizing. The leuconostoc bacteria (common in early starter phases) produce carbon dioxide first, then fade as the acid-loving lactobacilli take over. Keep feeding. Discard half. Add fresh flour and water. By day seven, you should see predictable rise and fall patterns.
The catch? Not all flours behave the same. Rye flour ferments faster than wheat—often doubling in four hours when wheat takes eight. Many Montréal bakers keep a rye starter for this reason. Whole grain flour produces more enzymatic activity too. If you're struggling with a slow starter, switch to King Arthur Bread Flour or add a tablespoon of whole rye to your regular feedings.
Worth noting—chlorinated tap water can slow fermentation. Let water sit out overnight, or use filtered. The yeast don't need much. Just consistency.
Feeding Schedule That Actually Works
Twice daily once the starter matures. Morning and evening. Equal parts starter, flour, and water by weight (1:1:1 ratio). Some bakers prefer 1:2:2 for a more diluted, longer-lasting food source. Both work. The key is regularity. Wild yeast colonies thrive on routine.
If you're not baking daily, store the starter in the refrigerator. Feed it weekly. Pull it out two days before baking—feed it twice at room temperature to wake it up. Cold storage slows metabolism but doesn't kill the culture. Some bakers claim their starter tastes better after a week in the fridge. (The acidity develops more complex flavor profiles.)
What's the Windowpane Test—and Why Does It Matter?
It's the simplest way to check gluten development. Stretch a small piece of dough between your fingers. If it thins to a translucent membrane without tearing, the gluten network is strong enough to trap gas during fermentation.
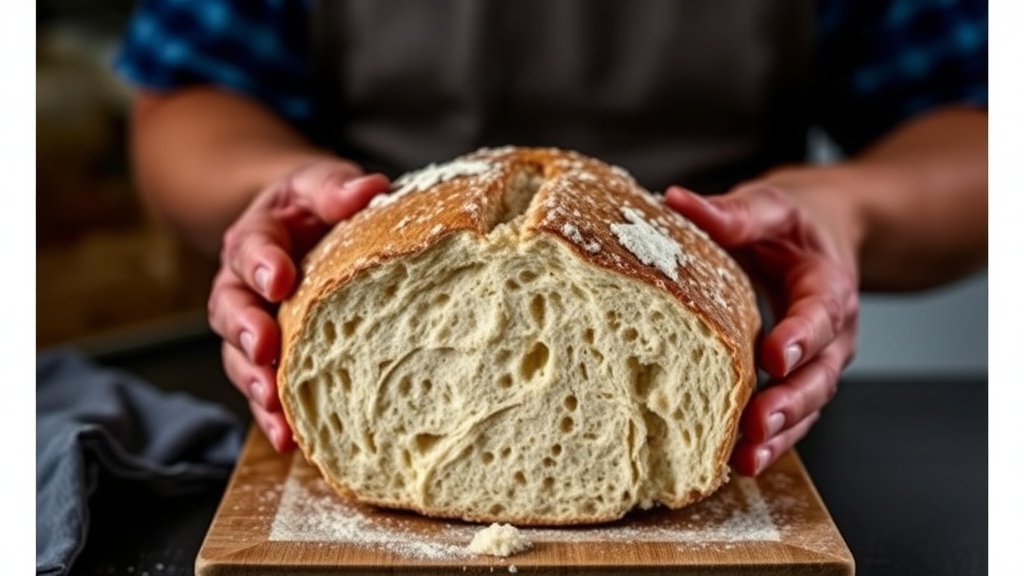
Under-developed gluten equals flat bread. No exceptions. The dough might rise during bulk fermentation, but it won't hold that rise in the oven. Sourdough relies on two things: the CO2 produced by yeast, and the elastic structure that captures it. Miss one, and you've got a pancake.
Here's how to build that structure without exhausting your arms. Stretch and folds—four sets, spaced thirty minutes apart. Wet your hand. Grab the edge of the dough. Pull up. Fold toward the center. Rotate the bowl. Repeat. This method (popularized by Tartine Bakery in San Francisco) builds strength gently. No kneading required. The dough stays wetter—resulting in that open, holey crumb sourdough is famous for.
That said, high-hydration doughs (75% water or more) demand practice. They stick. They slouch. If you're starting out, aim for 70% hydration. That's 700 grams of water per 1000 grams of flour. Manageable. Predictable. Still produces excellent bread.
Timing the Bulk Fermentation
Look for 50% volume increase—not double. Doubling works for commercial yeast. Sourdough is different. Over-ferment, and the dough turns slack, soupy, impossible to shape. Under-ferment, and the crust splits weirdly in the oven. The "poke test" helps: wet a finger, press the dough. It should spring back slowly, leaving a small indentation. Immediate spring back means keep waiting. No spring back means you've gone too far.
Why Is My Sourdough Bread Dense and Gummy?
Three usual suspects. Under-fermentation during bulk. Weak shaping technique. Or baking before the final proof completes.
Let's start with fermentation. If your kitchen runs cold—below 68°F (20°C)—bulk fermentation takes longer. Much longer. Twelve hours isn't unusual. Many beginners panic at hour six, thinking nothing's happening. They shape early. The result? A tight, rubbery crumb with no holes.
Weak shaping compounds this problem. Sourdough needs surface tension. The outer skin of the dough must stretch taut. Without tension, the loaf spreads sideways instead of rising upward. Practice the "stitching" method: fold the dough envelope-style, then roll it gently against the counter to seal the seam. Tension builds gradually. Don't rush.
The final proof—called "proofing" or "bench rest"—requires attention too. Cold proofing in the refrigerator (retardation) improves flavor and makes scoring easier. Four to twelve hours works for most doughs. Bake straight from the fridge. The cold dough holds its shape better when transferred to the hot Dutch oven.
| Flour Type | Protein Content | Best For | Fermentation Speed |
|---|---|---|---|
| Bread Flour (King Arthur) | 12.7% | Open crumb structure | Moderate |
| All-Purpose (Robin Hood) | 10-11% | Sandwich loaves | Slightly faster |
| Whole Wheat | 13-14% | Nutty flavor, dense crumb | Fast (enzyme-rich) |
| Rye Flour | 8-9% | Starter maintenance | Very fast |
Scoring and Baking Technique
The cut isn't decorative—though it can be. Scoring controls where steam escapes. Without a score, bread bursts randomly. The "ear" (that raised flap of crust) forms when you cut at a shallow angle, about 30 degrees. A straight-down cut opens the crumb but won't produce the dramatic ear prized by Instagram bakers.
Steam matters. Professional ovens inject it. Home ovens don't. The Dutch oven solves this—trapping moisture from the dough itself during the first 20 minutes of baking. Remove the lid after that initial phase. The crust browns. The Maillard reaction kicks in. You'll smell it before you see it—that toasty, almost nutty aroma drifting from the oven.
Internal temperature tells you when it's done. Not color. Not time. 205°F (96°C) for standard loaves. 208°F (97°C) if you're using whole grains. A Thermapen ONE instant-read thermometer removes all guesswork. Under-baked sourdough tastes gummy. The starches haven't fully gelatinized.
Storing and Reviving Your Loaf
Never slice hot bread. The interior steams. The crumb collapses. Wait at least one hour—two is better. The structure sets. Flavors mellow. Sourdough keeps at room temperature for three days, cut-side down on a cutting board. No plastic bags. They trap moisture, softening the crust you worked hard to develop.
For longer storage, slice and freeze. Toast directly from frozen. The crust crackles back to life. The crumb stays tender. This method preserves texture far better than refrigerating, which accelerates staling through starch retrogradation. (That's the technical term for bread going hard and stale—happens faster in cold environments, paradoxically.)
Sourdough rewards repetition. Each loaf teaches something. Maybe your starter was sluggish that week. Maybe the humidity dropped and you needed more water. Baking is observation—watching how living things behave, adjusting accordingly. The starter on your counter? It's been cultivated by bakers for thousands of years. You're part of that lineage now. Keep feeding it. Keep baking.